Learning guitar – Breaking down my final song

November 1st – 7th

I am so excited for this next leg of my guitar-learning plan.
I feel like I’ve hit the point where I’m truly feeling good about my abilities and really want to keep practicing outside of the scheduled practice sessions to get better. Having that foundation of music theory and basic G major chords to work from (although all still small in the grand scheme of music knowledge), has given me confidence to move forward in my learning and  has made me want to get better so that I can be able to play more songs.

At this point in my musicianship goal sheet, I am to be introducing the E chord, and then practicing my final song, “Hey Ya” by Outkast. This practice will happen over the next few weeks, right up until the end of the course.

New Chord

The E chord I’m adding to my mental music library is, thankfully, a nice, simple chord:

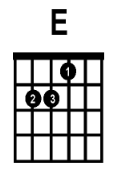
I was able to practice and get the hang of it pretty quickly and was feeling good about it after a few practice sessions!

Final Song

With the chord learned, I was able to move on to looking at the song I’d be learning for the final progress check-in – “Hey Ya” by Outkast. This song came out in 2003 and I still love it today. Outkast’s funky take on rap/hip-hop is a genre border-breaker, which is why I think some of their music, like this one, appeals to such a wide audience.
I’ve included a version of the song below, for you to have a listen so that you know what I’m working towards. It’s not the official video, as I’ve opted for for a cleaner version (well, the cleanest version I could find).

My first task, after learning the E chord, was to figure out a strumming pattern and the chord timing. I turned to Ultimate Guitar to help me out with this. I was familiar with this site, as my husband uses it a lot to find chords, and together we were able to pick out the best (and simplest) version of the song, which uses only the chords G C D & E.

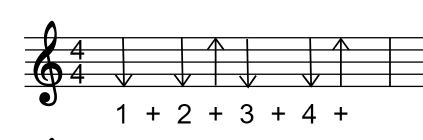
Strumming Pattern & Chord Timing

For strumming pattern, I’ll be sticking with the one suggested on Ultimate Guitar. For the 4/4 bars, that’ll be:

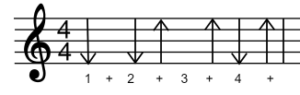
And for the 2/4 bars, that looks like:

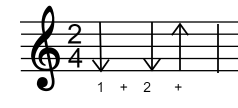
This song is put together as 3 bars of 4/4, 1 bar of 2/4, 2 bars of 4/4, then repeated.

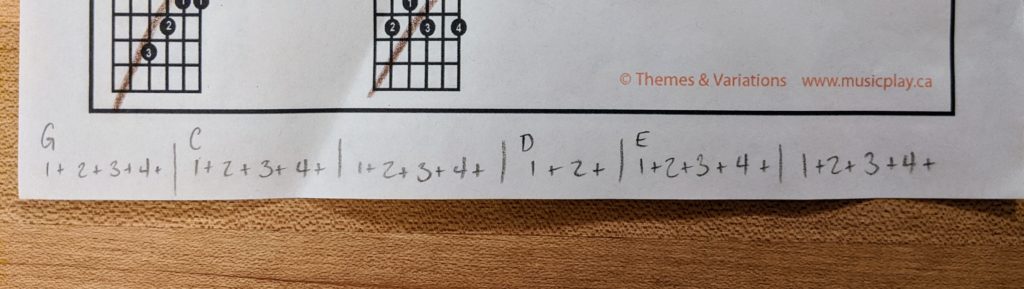
Next, I lined up the chords with the bars.  This is indicated on the website, but I found it tough to read while keeping the timing going in my head, so I wrote it out in a way that simplified it for me:

Challenges

With all the tools I need in place to play the song, I began practicing. The strumming pattern has been the trickiest for me to get a hang out so far. It’s a bit more complex than the one I used for my midterm song, and it took a lot of my brain power to keep counting in my head and have my hand match that! I’ve been practicing it almost everyday now and have already seen and felt so much improvement in this area – it’s beginning to feel a lot more natural  of a movement, and less foreign to me.

The second tricky bit I ran into was that pesky C chord. To play it on its own is fine, but for some reason it’s been such a toughie to transition to and from. Having that longer transition holds up the strumming pattern and makes everything sound a bit disjointed and clunky. I’ll definitely be practicing this during every session next week, because this will directly affect me being able to improve my strumming by keeping time instead of pausing part way through.

Coding platforms

Coding is being used more and more in classrooms as it becomes more relevant in today’s world. It also has been shown to provide many benefits including:

  • Providing logic for things we use and see in our everyday lives
  • Develops problem solving and computational thinking
  • Builds up a job skill
  • Can be fun!
Coding in the classroom

When many of us think of coding, this is what comes to mind…

New Coding Language
"New Coding Language" by Matrixizationized is licensed with CC BY 2.0. To view a copy of this license, visit https://creativecommons.org/licenses/by/2.0/

But there are tons of programs, websites, and manipulatives that are making learning coding more accessible and fun for young learners.  Instead of simply focusing on coding languages and rows and rows of symbols, these new programs are focusing on aspects of coding like putting pieces of logic together to make a sequence or presenting the learning as a game to get students into it. Some sites, like CSunplugged, are even taking the screentime out of the equation, while teaching the principles of coding without being online!

Glitch

During our breakout rooms, I spent the most time working with Glitch.

While I could see it being (maybe) easy to use and fun for someone with more coding knowledge, it was too much for me and my group mates to work with. We had no prior experience, so we were feeling pretty lost with it. This is definitely a program for a more experienced learner, who already knows the basics of coding language and some know-how of formatting it.  Without this, there not really much that can be accomplished.

We all agreed that this was a program suitable for older learners (upper high school) with previous experience, likely in a coding elective.

Other group reported back with some rave reviews for programs like Grasshopper, Scratch, and CSunplugged, which would all be better for younger students.

Thoughts

I really love the idea of teaching coding in the classroom! I completely agree that it’s hugely beneficial for all the reasons listed above. However, I’m someone that is a little leery of adding screentime in the classroom (I’d say I personally lean more towards a nature/outdoor school approach to things), so while some of the websites can be fun and effective, I don’t know about using them often enough to produce much benefit. Programs like CS unplugged or using coding manipulatives that the students can actually get their hands on is something that is so exciting to me, and something I would happily bring introduce to a class.

-Megan B.

Bake 3 – Bagels

This week was feeling like a bagel kind of week, so that’s what I decided to make!

I’ve only made bagels a handful of time a few years ago, but never with sourdough, so this was going to be another week of experimenting, learning, and crossing fingers that I’d end up with a half decent product. I was still riding the confidence from last week’s bake, so I was feeling pretty good going into bagel-making. Saturday, Halloween, I dove into this new challenge, excited to see the turn-out come Sunday morning.

Recipe

I followed the sourdough recipe from Little Spoon Farm, cutting it in half as I was making two different batches, and making minor adjustments which I’ve included in my recipe below. Each batch makes 4 bagels (so I ended up with 8 total), but it’s easy enough to multiply to make more.

  • 62 g sourdough starter
  • 125g water
  • 20g (+1 tbsp for boiling) sugar
  • 5g sea salt
  • 50g whole wheat flour
  • 200g AP flour

In a bowl, stir together starter, water and sugar. Add salt and flour until moderately incorporated.

Using a stand mixer with a dough hook, or kneading by hand, work dough for about 6 minutes.
Place back in a bowl, cover with a dish towel, and let rest for 12 hours.

After 12 hours, turn dough onto counter and divide into 4 equal parts. Form each part into a bagel shape.  Once done, place on a parchment or silpat lined baking sheet.
Cover tray with dish towel and let rest for 30-60 mins.

Preheat oven to 425F.
Fill a large pot about 3/4 full of water. Add 1 tbsp of sugar and boil.
Once boiling, put in a few bagels at a time, cooking 2 minutes per side. Put back on baking sheet when they’re done.

When all bagels are boiled, bake for 20-25 minutes.

Thoughts

The entire recipe and process was pretty darn simple and easy to follow!

After the 12 hour rise, the sourdough aroma was STRONG (in a good way). The end result was nowhere near as sour as I thought it would be based on the smell, which was a tad disappointing, but there was still decent sourdough flavour in both batches.

The Results

Whole-Wheat

Like my bake from a few weeks ago, the whole-wheat starter produced a saltier, more umami flavour in the bagel. There was a bit of a sourdough tang, I would have liked it to be a bit stronger, but it was definitely still noticeable.

White/All-Purpose

The difference between this and the whole-wheat batch was staggering. Despite having the same look and texture, the flavour was very different. The AP starter produced a lighter, brighter flavour. There was a lot more tang that had a clear sour taste. While the whole-wheat was more salty, the AP starter created a sweet taste

This bake was the most exciting in terms of sourdough production – the flavour profiles of the two starters are really developing and becoming so clearly different.

This bagel recipe was also a great success – it got two thumbs up from my husband and my son, so I’ll be making it again soon. Hopefully I can work out my shaping technique to get some more uniform looking bagels!

-Megan B.

Protected: Learning Guitar – Midterm progress

This content is password protected. To view it please enter your password below:

EdCamp

This week’s class was the first time I’d ever heard of EdCamp, but after our time learning about it and experiencing our own mini version of it, I’m absolutely interested in learning more and participating in it again.

What is EdCamp?

EdCamp is a model of Pro-D conference (on “unconference”) that centres around what educators want to learn about. It’s participant-driven, with no special guests, experts, or key speakers leading, but rather teachers proposing discussion topics, engaging in discussion, and sharing experiences with each other.

The hope of this model is that it is more engaging for those attending, and gives the educators more of what they need and are interested in learning about.
Participants can switch between discussion groups as they want, tailoring their learning and their day to benefit them most.

-Megan B.

Bake 2 – Croissants

Seeing as how I have not yet mastered basic sourdough bread, the next logical step on this journey would be to try and make the most difficult sourdough pastry I could possibly think of, right?

I’ve been feeling pretty bread-ed out lately and needed a change… In comes my hankering for a croissant. It’s been about 7 years since I’ve had a croissant. I absolutely loved them – warm and flakey, topped with a bit of raspberry jam – but have not yet been able to find a vegan version during these 7 years (red flag #1). So I thought, seeing as though I’m already tackling some difficult baking, might as well add that challenge to the list and make some vegan sourdough croissants! While I 100% understand that I’m setting myself up for failure, the experimentation and challenge of this task is too good to pass up.

Recipe

The search for a vegan sourdough croissant recipe came up with next to no results (red flag #2), but I stumbled upon one gem of a recipe on a vegan baking subreddit that looked promising.  I cut the recipe in half (the measurements I used are listed in the recipe below) and made one half batch with my whole-wheat starter, and one with my all-purpose starter, following the exact same measurements and methods for both.

  • 210g AP flour
  • 5g salt
  • 25g sugar
  • 70g sourdough starter
  • 60g alternative milk
  • 60g warm water
  • 25g + 100g vegan butter

Thinly slice 100g of butter and put it in the freezer.

Mix the dry ingredients together in a bowl.
Add the milk, water, and starter. Once mixed to a rough dough, knead for about 5 mins.
Add in 25g of butter, kneading for another 5 mins until incorporated.
Put dough in a bowl, cover and allow to rise for 2-3 hours at room temperature.

Roll the chilled dough into a rectangle, so that it about 1 cm thick.
Place frozen butter over 2/3 of the dough.
Fold the empty third over the middle. Fold another third on top of that. The stack will now be dough/butter/dough/butter/dough.
On a gently floured surface, roll stack into a rectangle about 1cm thick.
Fold the two ends towards the middle (but not overlapping). Fold in half the other way.
Wrap in saran wrap and refrigerate for 30 minutes.

Roll out chilled dough again to about 1cm thick. fold in thirds again.
Re wrap in saran and refrigerate for 1 hour.

Roll out chilled dough to 1cm thick. Cut out triangles, about 10 cm at the base and 2cm at the sides.
Gently stretch out the base of the triangle. Roll the dough, starting at the flat end of the base to the tip of the triangle. Repeat for all the triangles.
Place the croissants on a tray lined with parchment paper or a silpat mat. Place them so that the tip is on the bottom of the pastry.

Proof the croissants for 2-3 hours. In the final hour, preheat oven to 425 F.

Bake for 10 minutes at 425F, then reduce to 400F for 18 minutes.

Thoughts

The recipe, although a lot of steps, was simple and easy to follow. I was very pleasantly surprised at how good the laminated dough looked after

I rolled the croissants. I honestly didn’t think I’d get that clean of layers while I was making it. The vegan butter seems to have a higher water content and melts a bit easier than regular butter, so I was worried the melting/temperature would negatively impact the lamination process.

The Results

I CANNOT  CONTAIN MY EXCITEMENT – They worked!!! I really truly  can’t believe the beautiful croissants that came out of this experiment of a bake.

Whole -Wheat

Surprisingly, this batch rose a tad less during proofing, so I was nervous about how the sourdough was doing in there, but the oven spring really picked up the slack.
As far as flavour goes, the whole-wheat starter really shone through. The tang of the sourdough was subtle, but it was accompanied by a really beautiful nutty flavour, which my husband and I both thought was a great addition to the plain, buttery croissant taste.

White/All-Purpose

During the entire process, the dough of this batch was a bit easier to work with. After cutting and rolling, the lamination also appeared to be more prominently displayed. The rise during proofing was perfect – I definitely had more more confidence that this batch would turn out better because the starter seemed to give it more rise.
The sourdough flavour in this batch was more true and more pronounced without being too sour (which I wouldn’t want in a croissant.


I am still in shock at how this bake turned out, happy and intrigued with the specific sourdough flavours that came through in each batch, and so inspired to make more croissants!

Learning guitar – Practicing, transitioning, & putting it all together

Weeks 3 + 4 – Transitions + Strumming

October 11th-24th (up to date on posting blogs now!)

I’ve been feeling pretty good about how my hand positioning is going, so I began putting all of the pieces I learned together by beginning to work on my midterm song, ‘Alouette’. I used the chords/music from MusicPlay to see what notes I needed (G and D7) and began playing around with those. I feel confident doing them on their own, but transitioning between the two is way trickier than I though it would be. After a couple practice sessions, it’s still sounding pretty slow and clumsy, but my notes are a bit cleaner sounding, where as they were pretty sloppy when I first started practicing that.

Along with transitioning between G and D7, I needed to introduce strumming patterns. This was something I forgot about when creating my plan, and that became very apparent when I got to this stage – I know the notes I need to play, but how do I play them? I had to enlist the help of my husband, as I felt pretty lost on how to proceed with it. For the song ‘Alouette’ we came up with:

I’m not sure if that the correct way to write that out, but it made the most sense to me at the time and has helped me remember it, so I’m sticking with it!

Incorporating the strum pattern has been fairly easy, but I tried once to stick to the pattern and include lyrics – that didn’t work so well! I still need to focus so hard on counting that it’s feeling too tough to bring in an extra element right now.

I’ll get a bit more practice in, then post my video for midterm!

Learning guitar – Chords

WEEK 2 – Chord Notations

Notes from Oct 4th – 10th

This week was all about getting hands-on and learning how to play actual notes. As mentioned in my plan, my goal is to learn the chords G C D D7 Em Am within G Major.

To begin, I printed out a copy of  the guitar chord sheet from to keep with my guitar. That way I’ll always have it handy.
In terms of actually playing, I simply followed the directives on the chords sheet, placing the corresponding finger to the numbers listed on the strings. When I first started trying this out on Tuesday (Oct 6) , I managed to do one attempt oat each note and by the end of it, my fingers were so sore from pushing down on the strings! By my third practice session it was already becoming less delicate and I could feel my fingers toughening up to it.

As far as the sound of it goes, it was so-so at first; getting my fingers to not touch the strings around it was a bit of a challenge, but again, I can already hear and feel that improving a bit. My husband also gave me a pointer that if I place my fingers closer to the frets, it tends to produce a cleaner sound, which I’ve found helpful.

Although it’s still early, the most difficult part of this stage in learning so far is trying to memorize the notes. I’ve been working at it quite a bit and I feel like I always have to check with the page to see what finger positioning to do for each one.  I’m hoping to see some improvements with that in the coming weeks.

-Megan B.

Learning guitar – The basics

Gah! Life has been busy and I hadn’t had a spare moment to transfer my music progress notes to a blog post, but now is the time. I’ll be uploading a new blog marking my past month’s progress every 2 days (or so) to get myself caught up.

So, without further ado…

Goals

This is my first time learning an instrument since a sad attempt at recorder  in grade 5, so needless to say, I have a lot of learning to do. I’m going to be tackling guitar, which I know is a bit of a toughy to get a hang of, but I’m motivated and I think the payoff of being able to play will be worth it.
By the midterm on October 30th, my goal is to be able to understand guitar notations of common chords within G Major and be playing these chords: G C D D7 Em Am
I will demonstrate this new knowledge and know-how by playing the song “Alouette” using the chords G/D7 in the 4/4 time signature.

Perceived hurdles

At this stage, being a complete beginner, my greatest measure of success will be being able to read the notes on the page or screen, then translate them to a finger position on guitar, all the while being mindful of the timing of the song.


Week 1 – Basic Music Theory

Notes from Sept 27th – Oct 3rd

This week I budgeted for time to begin understanding basic music theory. I have absolutely no prior knowledge in reading music or understanding what to do with the notes and symbols on sheet music, so there will be a lot of learning for me to do.

From what we’ve learned in class so far, I already feeling like I’m getting a better start that I’d planned for. This gave me a headstart in already being able to identify different note values (whole, half, quarter, and eighths), time signatures, and rests (I had no clue what those symbols were before!)
To build upon this, I began the process of learning the notes. I found a simple photo showing the notes with the acronym FACE and the mnemonic “Every Good Boy Deserves Fruit” to help remember the notes.

Then I looked up simple pieces of music and would try to identify the notes in the songs as a way to practice and get used to which notes are where.

It’s only been a week of practice, and I have yet to even touch the guitar other than making sure it’s in tune, but I’m feeling pretty confident about how much I’m understanding so far. Hopefully this feeling will translate into next week when I get playing.

-Megan B.

Benefits of using video

Using video as a learning tool can be a great way to engage student and present info that may be difficult or not as exciting to present otherwise.
Presenting classes via pre-recorded video also allows students to review lessons afterwards, and re-watching can help clarify info for those who may not be comfortable asking questions aloud.

I’ve listed below some ways in which video can be used as a helpful, learning tool to help boost a lesson.

Helps answer questions

Like the 1878 clip of the horse running, video can help us gain the tools to speed up, slow down, manipulate, or see from a different perspective things that would be difficult to know otherwise.

Before this recording, people were unsure whether or not a running horse ever had all hooves off the ground at once. Using a series of photographs to create a video, they were able to show that this was the case.

Captions

A huge part of making a classroom inclusive is making sure that learning resources are available for all students. Using a video with captions is a hugely helpful way for those who are hard of hearing or Deaf  to be able to learn and participate in the lesson at hand. These captions can be added by the content creator, or if the video is being uploaded on Youtube, there’s a handy tool that creates (mostly) accurate captions for you.
Additionally, it’s important to note that captions can be useful for all learners. Hearing the audio while reading along is a good practice for reading skills and helps in taking in the info being presented.

Read-a-long

In a similar vein, read-a-long stories allow student to read along to stories while watching the pictures on the screen. Some read-a-longs offer highlighted words to follow and animations.

Timelapses

These are a fun way to show something that would take too long to show in class, but is significant to know.

Screencasts

Screencasts are videos of someone talking over a separate screen (ex: a powerpoint presentation or animated clip). These are useful if explaining diagrams, charts, or images. They also handy in explaining processes for detailed written works like math equations. Khan Academy is a popular, but well done example of using these effectively.